Signing a Driver During Development and Testing
Before you install a driver on a computer running a 64-bit version of Windows, you must sign the driver package. For testing purposes, you can test sign the driver package, which is a more relaxed form of signing than signing for public release.
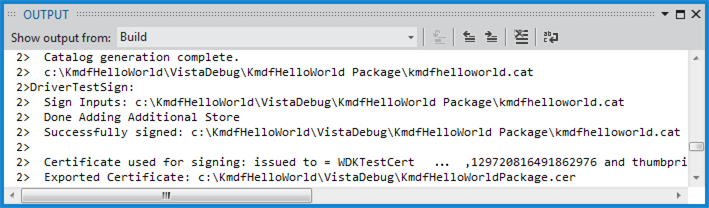
In Microsoft Visual Studio, test signing is enabled by default. Suppose you have created a KMDF driver solution as described in Writing a KMDF driver based on a template. When you build the solution, you can see in the Output window that the driver package has been test signed.
Enabling test signing manually
To manually enable test signing, follow these steps.
In Visual Studio, open a solution that has a driver package project. Select and hold (or right-click) the driver package project, and choose Properties.
In the property pages for the package, navigate to Configuation Properties > Driver Signing > General. In the Sign Mode drop-down list, select Test Sign.
In the property pages for the package, navigate to Configuation Properties > Inf2Cat > General. In the Run Inf2Cat drop-down list, select Yes.
Viewing the signed driver package
After you build your solution, navigate in File Explorer to the folder that contains your driver package. One of the files in the package is a catalog file. The catalog file contains the digital signature for the package. For an example of viewing the files in a signed package, see Writing a KMDF driver based on a template.
Sharing a signing certificate
When you test sign a driver package, Visual Studio creates a signing certificate (PFX file) and imports it into a certificate store on your host computer. When you deploy your test-signed driver package to a test computer, Visual Studio copies a verification certificate (CER file) to the test computer. If you want to share the certificate with developers who are building drivers on other host computers, you must share the signing certificate, not the verification certificate.
To share the signing certificate, follow these steps.
In Visual Studio, in the Solution Explorer window, select and hold (or right-click) your driver package project, and choose Properties.
In the property pages for the package, navigate to Configuation Properties > Driver Signing > General. In the Test Certificate field, choose Select From Store.
In the Select Certificate dialog box, locate your test-signing certificate. The name of the certificate will be similar to WDKTestCert yourName. Select your test-signing certificate, and select Properties. In the Details tab, select Copy to File.
Follow the instructions in the Certificate Export Wizard to export a PFX file. When you are asked whether you want to export the private key, select Yes, export the private key.
Share the exported PFX file with the other developers.
Related topics
Feedback
Coming soon: Throughout 2024 we will be phasing out GitHub Issues as the feedback mechanism for content and replacing it with a new feedback system. For more information see: https://aka.ms/ContentUserFeedback.
Submit and view feedback for