Evaluate the load-balancing capacity of your configuration
Important
This content is being retired and may not be updated in the future. The support for Machine Learning Server will end on July 1, 2022. For more information, see What's happening to Machine Learning Server?
Applies to: Machine Learning Server, Microsoft R Server 9.x
The Evaluate Capacity tool allows you to test your own R and Python code deployed as a web service in your own setup. The tool outputs an accurate evaluation of the latency/thread count for the simulation parameters you define and a break-down graph.
You can define the parameters for the traffic simulation for a given configuration or for a given web service. You can test for maximum latency or maximum thread count.
Maximum Latency: Define the maximum number of milliseconds for a web node request, the initial thread count, and the thread increments for the test. The test increases the number of threads by the defined increment until the defined time limit is reached.
Maximum Thread Count: Define the number of threads against which you want to run, such as 10, 15, or 40. The test increases the number of parallel requests by the specified increment until the maximum number of threads is reached.
Important
Web nodes are stateless, and therefore, session persistence ("stickiness") is not required. For proper access token signing and verification across your configuration, ensure that the JWT certificate settings are exactly the same for every web node. These JWT settings are defined on each web node in the configuration file, appsetting.json. Learn more...
Configure Test Parameters
Machine Learning Server 9.3 and later
In Machine Learning Server 9.3 and later, you can use admin extension of the Azure Command Line Interface (Azure CLI) to evaluate your configuration's capacity.
Important
- You must first set up your nodes before doing anything else with the
adminextension of the CLI. - You do not need an Azure subscription to use this CLI. It is installed as part of Machine Learning Server and runs locally.
On the machine hosting the node, launch a command-line window or terminal with administrator (Windows) or root/sudo (Linux) privileges.
Define and run the capacity evaluation. For help, run
az ml admin capacity --help# With elevated privileges, run the following commands. az ml admin capacity runCLI options for 'capacity run' Definition Default --strategy Use latencyto increase the number of threads by the defined increment until the defined time limit is reached.
Usethreadto increase the number of parallel requests by the specified increment until the maximum number of threads is reached.n/a --latency Used for the strategy latency, the maximum latency in milliseconds after which the test stops.250 --max-thread Used for the strategy thread, the maximum thread count after which the test stops running.50 --min-thread The minimum thread count at which the test starts. 10 --increment The increment by which the number of threads increases for each iteration until the maximum latency is reached. 10 --service The name of the web service to test. n/a --version The version of the web service to test. n/a --args Enter the required input parameters for the service in a JSON format.
For example, for a vector/matrix, follow the JSON format such as '[1,2,3]' for vector, '[[…]]' for matrix. A data.frame is a map where each key is a column name, and each value is represented by a vector of the column values.n/a Review the results onscreen.
Paste the URL printed onto the screen into your browser for a visual representation of the results (see below).
Earlier versions: 9.0 - 9.2
Evaluate capacity for Machine Learning Server 9.2 and R Server 9.x.
On the web node, launch the administration utility with administrator privileges (Windows) or root/sudo privileges (Linux).
From the main menu, choose the option to Evaluate Capacity and review the current test parameters.
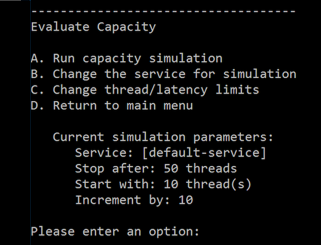
To choose a different web service:
- From the submenu, choose the option for Change the service for simulation.
- Specify the new service:
- To use an existing service, enter 'Yes' and provide the service's name and version as '<name>/<version>'. For example,
my-service/1.1. - To use the generated [default service], enter 'No'.
- To use an existing service, enter 'Yes' and provide the service's name and version as '<name>/<version>'. For example,
- When prompted, enter the required input parameters for the service in a JSON format.
For example, for a vector/matrix, follow the JSON format such as '[1,2,3]' for vector, '[[…]]' for matrix. A data.frame is a map where each key is a column name, and each value is represented by a vector of the column values.
To test for the maximum latency:
- From the submenu, choose the option for Change thread/latency limits.
- When prompted, enter 'Time' to define the number of threads against which you want to test.
- Specify the maximum latency in milliseconds after which the test stops.
- Specify the minimum thread count at which the test starts.
- Specify the increment by which the number of threads increases for each iteration until the maximum latency is reached.
To test for the maximum number of parallel requests that can be supported:
- From the submenu, choose the option for Change thread/latency limits.
- When prompted, enter 'Threads' to define the maximal threshold for the duration of a web node request.
- Specify the maximum thread count after which the test stops running.
- Specify the minimum thread count at which the test starts.
- Specify the increment by which the number of threads increases for each iteration.
From the main menu, choose the option to Evaluate Capacity. The current test parameters appear.
From the sub menu, choose the option to Run capacity simulation to start the simulation.
Review the results onscreen.
Paste the URL printed onto the screen into your browser for a visual representation of the results (see below).
Understanding the Results
It is important to understand the results of these simulations to determine whether any configuration changes are warranted, such as adding more web or compute nodes, increasing the pool size, and so on.
Console Results
After the tool is run, the results are printed to the console.
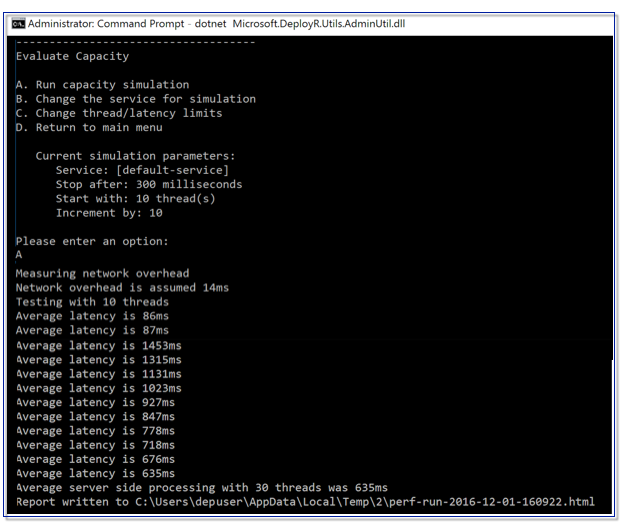
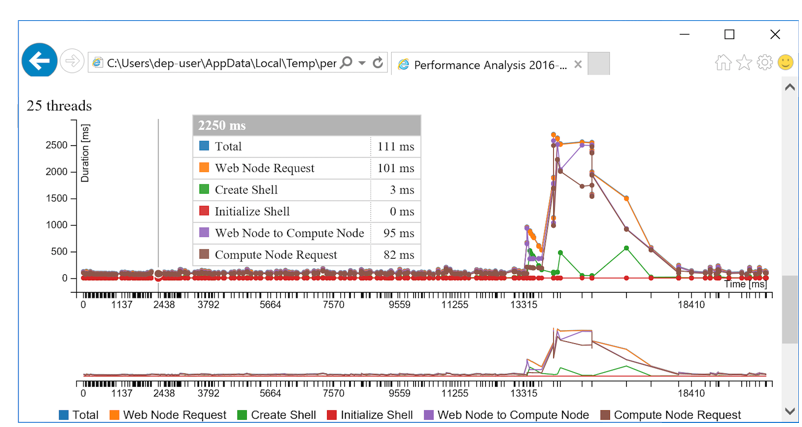
Chart Report
The test results are divided into request processing stages to enable you to see if any configuration changes are warranted, such as adding more web or compute nodes, increase the pool size, and so on.
| Stage | Time Measured |
|---|---|
| Web Node Request | Time for the request from the web node's controller to go all the way to deployr-rserve/JupyterKernel and back. |
| Create Shell | Time to create a session or take it from the pool |
| Initialize Shell | Time to load the data (model or snapshot) into the session prior to execution |
| Web Node to Compute Node | Time for a request from the web node to reach the compute node |
| Compute Node Request | Time for a request from the compute node to reach deployr-rserve/JupyterKernel and return to the node |
You can also explore the results visually in a break-down graph using the URL that is returned to the console.
Session Pools
When using Machine Learning Server for operationalization, code is executed in a session or as a service on a compute node. In order to optimize load-balancing performance, Machine Learning Server is capable of establishing and maintaining a pool of R and Python sessions for code execution.
There is a cost to creating a session both in time and memory. So having a pool of existing sessions awaiting code execution requests means no time is lost on session creation at runtime thereby shortening the processing time. Instead, the time needed to create sessions for the pool occurs whenever the compute node is restarted. For this reason, the larger the defined initial pool size (InitialSize), the longer it takes to start up the compute node. New sessions are added to the pool as needed to execute in parallel. However, after a request is handled and the session is idle, the session is closed if the number of shells exceeds the maximum pool size (MaxSize).
However, during simulation test, the test continues until the test threshold is met (maximum threads or latency). If the number of shells needed to run the test exceeds the number of sessions in the pool, a new session is created on-demand when the request is made and the time it takes to execute the code is longer since time is spent creating the session itself.
The size of this pool can be adjusted in the external configuration file, appsettings.json, found on each compute node.
"Pool": {
    "InitialSize": 5,
    "MaxSize": 80
  },
Since each compute node has its own thread pool for sessions, configuring multiple compute nodes means that more pooled sessions are available to your users.
Important
If Machine Learning Server is configured for Python only, then only a pool of Python sessions is created. If the server is configured only for R, then only a pool of R sessions is created. And if it configured for both R and Python, then two separate pools are created, each with the same initial size and maximum size.
To update the thread pool:
On each compute nodes, open the configuration file, <compute-node-install-path>/appsettings.json. (Find the install path for your version.)
Search for the section starting with
"Pool": {Set the InitialSize. This value is the number of R and/or Python sessions that are pre-created for your users each time the compute node is restarted.
Set the MaxSize. This is the maximum number of R and/or Python sessions that can be pre-created and held in memory for processing code execution requests.
Save the file.
Restart the compute node services.
Repeat these changes on every compute node.
Note
Each compute node should have the same appsettings.json properties.