Optimize animations, media, and images
Create Universal Windows Platform (UWP) apps with smooth animations, high frame rate, and high-performance media capture and playback.
Make animations smooth
A key aspect of UWP apps is smooth interactions. This includes touch manipulations that "stick to your finger," smooth transitions and animations, and small motions that provide input feedback. In the XAML framework there is a thread called the composition thread that is dedicated to the composition and animation of an app’s visual elements. Because the composition thread is separate from UI thread (the thread that runs framework and developer code), apps can achieve a consistent frame rate and smooth animations regardless of complicated layout passes or extended calculations. This section shows how to use the composition thread to keep an app’s animations buttery smooth. For more info about animations, see Animations overview. To learn about increasing an app’s responsiveness while performing intensive computations, see Keep the UI thread responsive.
Use independent instead of dependent animations
Independent animations can be calculated from beginning to end at the time of creation because changes to the property being animated don't affect rest of the objects in a scene. Independent animations can therefore run on the composition thread instead of the UI thread. This guarantees that they remain smooth because the composition thread is updated at a consistent cadence.
All of these types of animations are guaranteed to be independent:
Object animations using key frames
Zero-duration animations
Animations to the Canvas.Left and Canvas.Top properties
Animations to the UIElement.Opacity property
Animations to properties of type Brush when targeting the SolidColorBrush.Color subproperty
Animations to the following UIElement properties when targeting subproperties of these return value types:
Dependent animations affect layout, which therefore cannot be calculated without extra input from the UI thread. Dependent animations include modifications to properties like Width and Height. By default, dependent animations are not run and require an opt-in from the app developer. When enabled, they run smoothly if the UI thread remains unblocked, but they begin to stutter if the framework or app is doing a lot of other work on the UI thread.
Almost all animations in the XAML framework are independent by default, but there are some actions that you can take to disable this optimization. Beware of these scenarios particularly:
- Setting the EnableDependentAnimation property to allow a dependent animation to run on the UI thread. Convert these animations into an independent version. For example animate ScaleTransform.ScaleX and ScaleTransform.ScaleY instead of the Width and Height of an object. Don’t be afraid to scale objects like images and text. The framework applies bilinear scaling only while the ScaleTransform is being animated. The image/text will be rerasterized at the final size to ensure it’s always clear.
- Making per frame updates, which are effectively dependent animations. An example of this is applying transformations in the handler of the CompositonTarget.Rendering event.
- Running any animation considered independent in an element with the CacheMode property set to BitmapCache. This is considered dependent because the cache must be re-rasterized for each frame.
Don't animate a WebView or MediaPlayerElement
Web content within a WebView control is not directly rendered by the XAML framework and it requires extra work to be composed with the rest of the scene. This extra work adds up when animating the control around the screen and can potentially introduce synchronization issues (for example, the HTML content might not move in sync with the rest of the XAML content on the page). When you need to animate a WebView control, swap it with a WebViewBrush for the duration of the animation.
Animating a MediaPlayerElement is a similarly bad idea. Beyond the performance detriment, it can cause tearing or other artifacts in the video content being played.
Note The recommendations in this article for MediaPlayerElement also apply to MediaElement. MediaPlayerElement is only available in Windows 10, version 1607, so if you are creating an app for a previous version of Windows you need to use MediaElement.
Use infinite animations sparingly
Most animations execute for a specified amount of time, but setting the Timeline.Duration property to Forever allows an animation to run indefinitely. We recommend minimizing the use of infinite animations because they continually consume CPU resources and can prevent the CPU from going into a low power or idle state, causing it to run out of power more quickly.
Adding a handler for CompositionTarget.Rendering is similar to running an infinite animation. Normally the UI thread is active only when there is work to do, but adding handler for this event forces it to run every frame. Remove the handler when there is no work to be done and reregister it when it’s needed again.
Use the animation library
The Windows.UI.Xaml.Media.Animation namespace includes a library of high-performance, smooth animations that have a look and feel consistent with other Windows animations. The relevant classes have "Theme" in their name, and are described in Animations overview. This library supports many common animation scenarios, such as animating the first view of the app and creating state and content transitions. We recommend using this animation library whenever possible to increase performance and consistency for UWP UI.
Note The animation library can't animate all possible properties. For XAML scenarios where the animation library doesn't apply, see Storyboarded animations.
Animate CompositeTransform3D properties independently
You can animate each property of a CompositeTransform3D independently, so apply only the animations you need. For examples and more info, see UIElement.Transform3D. For more info about animating transforms, see Storyboarded animations and Key-frame and easing function animations.
Optimize media resources
Audio, video, and images are compelling forms of content that the majority of apps use. As media capture rates increase and content moves from standard definition to high definition the amount of resources need to store, decode, and play back this content increases. The XAML framework builds on the latest features added to the UWP media engines so apps get these improvements for free. Here we explain some additional tricks that allow you to get the most out media in your UWP app.
Release media streams
Media files are some of the most common and expensive resources apps typically use. Because media file resources can greatly increase the size of your app's memory footprint, you must remember to release the handle to media as soon as the app is finished using it.
For example, if your app working with a RandomAccessStream or an IInputStream object, be sure to call the close method on the object when your app has finished using it, to release the underlying object.
Display full screen video playback when possible
In UWP apps, always use the IsFullWindow property on the MediaPlayerElement to enable and disable full window rendering. This insures system level optimizations are used during media playback.
The XAML framework can optimize the display of video content when it is the only thing being rendered, resulting in an experience that uses less power and yields higher frame rates. For most efficient media playback set the size of a MediaPlayerElement to be the width and height of the screen and don’t display other XAML elements
There are legitimate reasons to overlay XAML elements on a MediaPlayerElement that takes up the full width and height of the screen, for example closed captions or momentary transport controls. Make sure to hide these elements (set Visibility="Collapsed") when they are not needed to put media playback back into its most efficient state.
Display deactivation and conserving power
To prevent the display from be deactivating when user action is no longer detected, such as when an app is playing video, you can call DisplayRequest.RequestActive.
To conserve power and battery life, you should call DisplayRequest.RequestRelease to release the display request as soon as it is no longer required.
Here are some situations when you should release the display request:
- Video playback is paused, for example by user action, buffering, or adjustment due to limited bandwidth.
- Playback stops. For example, the video is done playing or the presentation is over.
- A playback error has occurred. For example, network connectivity issues or a corrupted file.
Put other elements to the side of embedded video
Often apps offer an embedded view where video is played within a page. Now you obviously lost the full screen optimization because the MediaPlayerElement is not the size of the page and there are other XAML objects drawn. Beware of unintentionally entering this mode by drawing a border around a MediaPlayerElement.
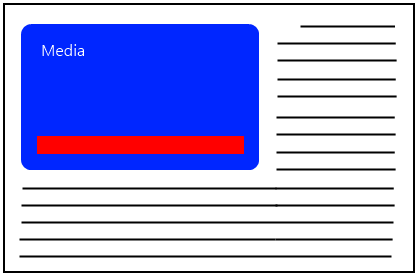
Don’t draw XAML elements on top of video when it’s in embedded mode. If you do, the framework is forced to do a little extra work to compose the scene. Placing transport controls below an embedded media element instead of on top of the video is a good example of optimizing for this situation. In this image, the red bar indicates a set of transport controls (play, pause, stop, etc.).
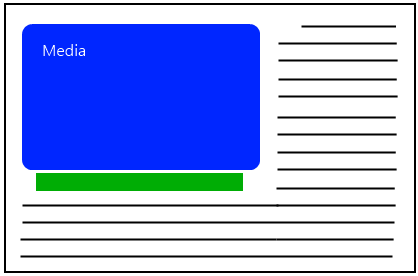
Don’t place these controls on top of media that is not full screen. Instead place the transport controls somewhere outside of the area where the media is being rendered. In the next image, the controls are placed below the media.
Delay setting the source for a MediaPlayerElement
Media engines are expensive objects and the XAML framework delays loading dlls and creating large objects as long as possible. The MediaPlayerElement is forced to do this work after its source is set via the Source property. Setting this when the user is really ready to play media delays the majority of the cost associated with the MediaPlayerElement as long as possible.
Set MediaPlayerElement.PosterSource
Setting MediaPlayerElement.PosterSource enables XAML to release some GPU resources that would have otherwise been used. This API allows an app to use as little memory as possible.
Improve media scrubbing
Scrubbing is always a tough task for media platforms to make really responsive. Generally people accomplish this by changing the value of a Slider. Here are a couple tips on how to make this as efficient as possible:
- Update the value of Slider based on a timer that queries the Position on the MediaPlayerElement.MediaPlayer. Make sure to use a reasonable update frequency for your timer. The Position property only updates every 250 millisecond during playback.
- The size of the step frequency on the Slider must scale with the length of the video.
- Subscribe to the PointerPressed, PointerMoved, PointerReleased events on the slider to set the PlaybackRate property to 0 when the user drags the thumb of the slider.
- In the PointerReleased event handler, manually set the media position to the slider position value to achieve optimal thumb snapping while scrubbing.
Match video resolution to device resolution
Decoding video takes a lot of memory and GPU cycles, so choose a video format close to the resolution it will be displayed at. There is no point in using the resources to decode 1080 video if it’s going to get scaled down to a much smaller size. Many apps don’t have the same video encoded at different resolutions; but if it is available, use an encoding that is close to the resolution at which it will be displayed.
Choose recommended formats
Media format selection can be a sensitive topic and is often driven by business decisions. From a UWP performance perspective, we recommend H.264 video as the primary video format and AAC and MP3 as the preferred audio formats. For local file playback, MP4 is the preferred file container for video content. H.264 decoding is accelerated through most recent graphics hardware. Also, although hardware acceleration for VC-1 decoding is broadly available, for a large set of graphics hardware on the market, the acceleration is limited in many cases to a partial acceleration level (or IDCT level), rather than a full-steam level hardware offload (i.e. VLD mode).
If you have full control of the video content generation process, you must figure out how to keep a good balance between compression efficiency and GOP structure. Relatively smaller GOP size with B pictures can increase the performance in seeking or trick modes.
When including short, low-latency audio effects, for example in games, use WAV files with uncompressed PCM data to reduce processing overhead that is typical for compressed audio formats.
Optimize image resources
Scale images to the appropriate size
Images are captured at very high resolutions, which can lead to apps using more CPU when decoding the image data and more memory after it’s loaded from disk. But there’s no sense decoding and saving a high-resolution image in memory only to display it smaller than its native size. Instead, create a version of the image at the exact size it will be drawn on-screen using the DecodePixelWidth and DecodePixelHeight properties.
Don't do this:
<Image Source="ms-appx:///Assets/highresCar.jpg"
       Width="300" Height="200"/>    <!-- BAD CODE DO NOT USE.-->
Instead, do this:
<Image>
    <Image.Source>
    <BitmapImage UriSource="ms-appx:///Assets/highresCar.jpg"
                 DecodePixelWidth="300" DecodePixelHeight="200"/>
    </Image.Source>
</Image>
The units for DecodePixelWidth and DecodePixelHeight are by default physical pixels. The DecodePixelType property can be used to change this behavior: setting DecodePixelType to Logical results in the decode size automatically accounting for the system’s current scale factor, similar to other XAML content. It would therefore be generally appropriate to set DecodePixelType to Logical if, for instance, you want DecodePixelWidth and DecodePixelHeight to match the Height and Width properties of the Image control the image will be displayed in. With the default behavior of using physical pixels, you must account for the system’s current scale factor yourself; and you should listen for scale change notifications in case the user changes their display preferences.
If DecodePixelWidth/Height are explicitly set larger than the image will be displayed on-screen then the app will unnecessarily use extra memory—up to 4 bytes per pixel—which quickly becomes expensive for large images. The image will also be scaled down using bilinear scaling which could cause it to appear blurry for large scale factors.
If DecodePixelWidth/DecodePixelHeight are explicitly set smaller than the image will be displayed on screen then it will be scaled up and could appear pixelated.
In some cases where an appropriate decode size cannot be determined ahead of time, you should defer to XAML’s automatic right-size-decoding which will make a best effort attempt to decode the image at the appropriate size if an explicit DecodePixelWidth/DecodePixelHeight is not specified.
You should set an explicit decode size if you know the size of the image content ahead of time. You should also in conjunction set DecodePixelType to Logical if the supplied decode size is relative to other XAML element sizes. For example, if you explicitly set the content size with Image.Width and Image.Height, you could set DecodePixelType to DecodePixelType.Logical to use the same logical pixel dimensions as an Image control and then explicitly use BitmapImage.DecodePixelWidth and/or BitmapImage.DecodePixelHeight to control the size of the image to achieve potentially large memory savings.
Note that Image.Stretch should be considered when determining the size of the decoded content.
Right-sized decoding
In the event that you don't set an explicit decode size, XAML will make a best effort attempt to save memory by decoding an image to the exact size it will appear on-screen according to the containing page’s initial layout. You're advised to write your application in such a way as to make use of this feature when possible. This feature will be disabled if any of the following conditions are met.
- The BitmapImage is connected to the live XAML tree after setting the content with SetSourceAsync or UriSource.
- The image is decoded using synchronous decoding such as SetSource.
- The image is hidden via setting Opacity to 0 or Visibility to Collapsed on the host image element or brush or any parent element.
- The image control or brush uses a Stretch of None.
- The image is used as a NineGrid.
CacheMode="BitmapCache"is set on the image element or on any parent element.- The image brush is non-rectangular (such as when applied to a shape or to text).
In the above scenarios, setting an explicit decode size is the only way to achieve memory savings.
You should always attach a BitmapImage to the live tree before setting the source. Any time an image element or brush is specified in markup, this will automatically be the case. Examples are provided below under the heading "Live tree examples". You should always avoid using SetSource and instead use SetSourceAsync when setting a stream source. And it's a good idea to avoid hiding image content (either with zero opacity or with collapsed visibility) while waiting for the ImageOpened event to be raised. Doing this is a judgment call: you won't benefit from automatic right-sized decoding if it's done. If your app must hide image content initially then it should also set the decode size explicitly if possible.
Live tree examples
Example 1 (good)—Uniform Resource Identifier (URI) specified in markup.
<Image x:Name="myImage" UriSource="Assets/cool-image.png"/>
Example 2 markup—URI specified in code-behind.
<Image x:Name="myImage"/>
Example 2 code-behind (good)—connecting the BitmapImage to the tree before setting its UriSource.
var bitmapImage = new BitmapImage();
myImage.Source = bitmapImage;
bitmapImage.UriSource = new URI("ms-appx:///Assets/cool-image.png", UriKind.RelativeOrAbsolute);
Example 2 code-behind (bad)—setting the BitmapImage's UriSource before connecting it to the tree.
var bitmapImage = new BitmapImage();
bitmapImage.UriSource = new URI("ms-appx:///Assets/cool-image.png", UriKind.RelativeOrAbsolute);
myImage.Source = bitmapImage;
Caching optimizations
Caching optimizations are in effect for images that use UriSource to load content from an app package or from the web. The URI is used to uniquely identify the underlying content, and internally the XAML framework will not download or decode the content multiple times. Instead, it will use the cached software or hardware resources to display the content multiple times.
The exception to this optimization is if the image is displayed multiple times at different resolutions (which can be specified explicitly or through automatic right-sized decoding). Each cache entry also stores the resolution of the image, and if XAML cannot find an image with a source URI that matches the required resolution then it will decode a new version at that size. It will not, however, download the encoded image data again.
Consequently, you should embrace using UriSource when loading images from an app package, and avoid using a file stream and SetSourceAsync when it's not required.
Images in virtualized panels (ListView, for instance)
If an image is removed from the tree—because the app explicitly removed it, or because it’s in a modern virtualized panel and was implicitly removed when scrolled out of view—then XAML will optimize memory usage by releasing the hardware resources for the image since they are no longer required. The memory is not released immediately, but rather is released during the frame update that occurs after one second of the image element no longer being in the tree.
Consequently, you should strive to use modern virtualized panels to host lists of image content.
Software-rasterized images
When an image is used for a non-rectangular brush or for a NineGrid, the image will use a software rasterization path, which will not scale images at all. Additionally, it must store a copy of the image in both software and hardware memory. For instance, if an image is used as a brush for an ellipse then the potentially large full image will be stored twice internally. When using NineGrid or a non-rectangular brush, then, your app should pre-scale its images to approximately the size they will be rendered at.
Background thread image-loading
XAML has an internal optimization that allows it to decode the contents of an image asynchronously to a surface in hardware memory without requiring an intermediate surface in software memory. This reduces peak memory usage and rendering latency. This feature will be disabled if any of the following conditions are met.
- The image is used as a NineGrid.
CacheMode="BitmapCache"is set on the image element or on any parent element.- The image brush is non-rectangular (such as when applied to a shape or to text).
SoftwareBitmapSource
The SoftwareBitmapSource class exchanges interoperable uncompressed images between different WinRT namespaces such as BitmapDecoder, camera APIs, and XAML. This class obviates an extra copy that would typically be necessary with WriteableBitmap, and that helps reduce peak memory and source-to-screen latency.
The SoftwareBitmap that supplies source information can also be configured to use a custom IWICBitmap to provide a reloadable backing store that allows the app to re-map memory as it sees fit. This is an advanced C++ use case.
Your app should use SoftwareBitmap and SoftwareBitmapSource to interoperate with other WinRT APIs that produce and consume images. And your app should use SoftwareBitmapSource when loading uncompressed image data instead of using WriteableBitmap.
Use GetThumbnailAsync for thumbnails
One use case for scaling images is creating thumbnails. Although you could use DecodePixelWidth and DecodePixelHeight to provide small versions of images, UWP provides even more efficient APIs for retrieving thumbnails. GetThumbnailAsync provides the thumbnails for images that have the file system already cached. This provides even better performance than the XAML APIs because the image doesn’t need to be opened or decoded.
FileOpenPicker picker = new FileOpenPicker();
picker.FileTypeFilter.Add(".bmp");
picker.FileTypeFilter.Add(".jpg");
picker.FileTypeFilter.Add(".jpeg");
picker.FileTypeFilter.Add(".png");
picker.SuggestedStartLocation = PickerLocationId.PicturesLibrary;

StorageFile file = await picker.PickSingleFileAsync();

StorageItemThumbnail fileThumbnail = await file.GetThumbnailAsync(ThumbnailMode.SingleItem, 64);

BitmapImage bmp = new BitmapImage();
bmp.SetSource(fileThumbnail);

Image img = new Image();
img.Source = bmp;
Dim picker As New FileOpenPicker()
picker.FileTypeFilter.Add(".bmp")
picker.FileTypeFilter.Add(".jpg")
picker.FileTypeFilter.Add(".jpeg")
picker.FileTypeFilter.Add(".png")
picker.SuggestedStartLocation = PickerLocationId.PicturesLibrary

Dim file As StorageFile = Await picker.PickSingleFileAsync()

Dim fileThumbnail As StorageItemThumbnail = Await file.GetThumbnailAsync(ThumbnailMode.SingleItem, 64)

Dim bmp As New BitmapImage()
bmp.SetSource(fileThumbnail)

Dim img As New Image()
img.Source = bmp
Decode images once
To prevent images from being decoded more than once, assign the Image.Source property from an Uri rather than using memory streams. The XAML framework can associate the same Uri in multiple places with one decoded image, but it cannot do the same for multiple memory streams that contain the same data and creates a different decoded image for each memory stream.
Feedback
Coming soon: Throughout 2024 we will be phasing out GitHub Issues as the feedback mechanism for content and replacing it with a new feedback system. For more information see: https://aka.ms/ContentUserFeedback.
Submit and view feedback for